


Something about that Joe Jordan painting yesterday put me in a nostalgic mood and wanting…

Joe Jordan
Today I have been mostly painting a portrait of Joe Jordan. As he’s wearing a Scotland shirt it seemed appropriate to paint this one with three layers of the tundra supergranulators. I used the Notanizer app to help me do this one and found a way to make things easier, so I’m going to go through this one step by step.
– First I found a portrait to use as subject matter and cropped it down to 4×6 proportions. With this I could fit it into the paper while leaving half an inch at the top and bottom that could be hidden behind a mount. There will be bits on the left and right that are hidden too, but it was important for me to not end up with the top of the head or the shirt badges hidden.
– I put the photo into the Notanizer app and moved the sliders around until I was happy with the resulting four value plan. I took a note of where the sliders finished up. They were at 5, 36 and 64 on a scale that went from 0 to 100.
– I put a 4*6 grid of squares over the paper, used this to put down a pencil drawing, then rubbed out all the grid lines.
– Then the painting started properly with me reserving all the white highlighted areas with masking fluid. Well, most of them. For the two big white shapes on the sleeves, I just reserves the outlines, then put masking fluid crosses in the middle of them to remind me not to fill them in. Now, I could have used my four value plan to help me identify those white res, but I didn’t do this be a use I’ve found an easier way. I got the Notanizer to give me a two value plan but put the slider at (checks notes from earlier) 64. This left all my whites white but made all the other values the same colour. Much easier to use. I also spattered on some stars or flying sweat drips in the background in the top half of the painting.
– Then the first layer went down. Tundra pink over all the light, medium and dark areas. This is the easiest task in the process as it means paint down everywhere except in the reserved white areas. To make things interesting, I lightly sprayed the paint with water and charged in some dryer paint in places.
– After that was dry I added the second layer: tundra blue over all the medium and dark areas. And to kelp me do this I got the Notanizer to do me a three value plan with the sliders at 36 and 64 so that the medium and dark areas looked the same and I didn’t need to remember to paint on both. This second layer is always the longest stage in the process and one that demands a lot of care. It’s the make or break stage. And, again, I sprayed on some water and charged in dry paint.
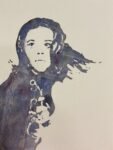
– And for the final stage I painted tundra violet over all the darkest areas. I sprayed water over and charged dry paint into Joe’s shirt shirt, the only big dark shape.
– And after that, just two more jobs. The first is to wait a long time before removing the masking fluid. A little bit of impatience here and you can end up smearing dark paint over some of those white areas. And the final job is to look at the end product and decide whether to make my tiny adjustments by any more of the medium or dark value colours to improve the likeness. And I didn’t think I needed to do that today. So that was me done.
I’m really happy with the final result today. I’ve caught all the joy of scoring a goal. The joy that means you can’t stop smiling, even when you’re missing teeth. I’ve also managed to get the supergranulators snapping, crackling and popping in both the background and on Joe’s shirt, something I wish I could do more often.
Joe was gifted to the local electrician who connected my studio up to the mains, a job that included digging a trench and burying the wires. He’s a huge Man Utd fan and is still suffering from the 1979 FA cup final.
Leave a Reply