


Today's a busy day, what with this being the first of three planned posts. Another…

Salvador Dali
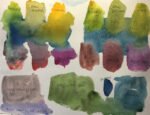
So here’s what I did with that Schmincke dot card. I quite fancied doing a portrait, so looked around for a simple portrait of a colourful character and found one of Salvador Dali.
I transformed the source photo into a two value poster using the Notanizer app – this is why I wanted quite a simple photo. I put down a 6×4 grid of squares on my watercolour paper, leaving a big enough empty margin around the squares for me to be able to frame it with all 24 squares fully visible inside the mount.
Then came the fun bit, adding in the colour. I started with the top row of the colours in the dot card (yellows and oranges) and applied these one at a time, starting with the first square, but then every third square after that. I didn’t fill the squares up to the edges, hoping to creat a mosaic effect as well as wanting to be able to erase any pencil gridlines at the end. I treated each square as a separate abstract painting, looking to copy the shapes I could see in the source photo without thinking about which facial features they represented. After completing all the yellow squares, I filled in all the red ones and finally the blues. In the two squares with eyes, I reserved highlights with masking fluid before painting. As a finishing touch, I spattered some of the more heavily pigmented colours in the big white area on the right. And that was me done.
Well, that was a lit of fun and I’ve finished up with something weird and off the wall that shows off the vibrancy of these colours. I like it and it’s up for sale. To see the price, click here.
I guess some people out there might notice that there are five white squares in my grid and therefore five colours that I didn’t swatch. All I can say is keep reading.
Leave a Reply